

WordPress is coded mainly in PHP programming language. To protect web servers from abuse, there is a time limit set for how long a PHP script can run.
Some WordPress hosting providers have set this value to a higher level while others may have set it to a lower level. When a script reaches the maximum execution time limit, it results into maximum execution time exceeded error.
In this article, we will show you how to fix the fatal error: maximum execution time exceeded in WordPress.

Why Maximum Execution Time Exceeded Error Occurs? #
WordPress is coded mainly in the PHP programming language. To protect web servers from abuse, there is a time limit set for how long a PHP script can run.
The actual time limit varies across hosting companies, however most of the times the maximum execution time is set between 30 – 60 seconds because that’s usually enough for a good PHP script to run.
When a script reaches the maximum execution time limit, it results in maximum execution time exceeded error.

Fixing Maximum Execution Time Exceeded Error #
Although Maximum Execution Time Exceeded error is named a ‘fatal error,’ it is one of the most common WordPress errors, and you can easily resolve this.
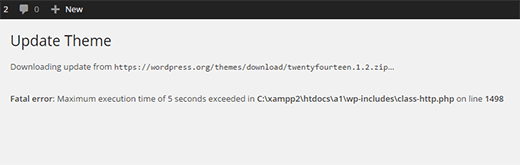
Depending on when and where the error is triggered, WordPress may show the following error message to your website visitors.

This is part of the fatal error protection feature added in WordPress 5.2. You may also receive an email that will tell you which plugin (if a plugin triggered the error) caused the issue.

The email will also include a special link, which will allow you to log in to WordPress with ‘Recovery mode’.

Once there, you can simply deactivate or delete the plugin causing the error.
However, if you don’t want to deactivate a plugin, then you can fix the underlying cause that triggered the error.
To fix the error, you will need to manually edit your .htaccess file and add a simple line of code.
Simply connect to your website using an FTP client.
Your .htaccess file is located in the same folder as your /wp-content/ and /wp-admin/ folders.
For example, if you are using FileZilla as your FTP client, then you can find it in the ‘Remote Site’ section on the right-hand column.

Once you locate the .htaccess file, right-click and open ‘View/Edit’ option. This will open the file with in a text editor.

Next, you need to add this line at the bottom of your .htaccess file:
php_value max_execution_time 300
If you are using Notepad as your text editor, here is how it may look.

Once done, save your file.
This code simply sets the value for maximum execution time to 300 seconds (5 minutes). You can now visit your website to see if the error is resolved.
If you still get the error, then try increasing the value to 600.
Another method to fix the maximum execution time exceeded error in WordPress is by modifying your php.ini file.
The php.ini file is a configuration file that defines settings for PHP on your server. On many WordPress hosting platforms, you may not see it inside your WordPress folder.
In that case, you can create a new php.ini file inside your WordPress root folder. After that, edit the php.ini file and add the following line.
max_execution_time = 60
Don’t forget to save and upload your changes back to the server. You can now visit your website and to see if the error has gone.
In most cases, increasing maximum execution time using either of these two methods will resolve the error. However if it doesn’t, then you need to contact your WordPress hosting provider for assistance.
We hope this article helped you fix the fatal error: maximum execution time exceeded in WordPress.
This article was originally published on WPBeginner.com


